
The event of the year is here and I have never been more prepared! For some that may not know too much about this event, Rock the Dots began in 2016 as a small event that celebrated Minnie Mouse and National Polka-Dot Day! Now, in only two years the event has grown into a full-blown extravaganza with Disney Parks Official merchandise, meet and greets with Minnie Mouse and multiple shopping opportunities with exclusive items at participating shops in Disney Springs.

While this event has always appealed to me, this will be the first time I will actually be able to attend in person, which is why I am going ALL OUT! I have decided to channel my inner Minnie Mouse and put together a fun, little DIY for this magical event! Let me tell you, I am not a crafty person, but thankfully I had a little help from my mom who is the craft wizard and I was able to put this together! So, lets not wait any longer and dive right in!
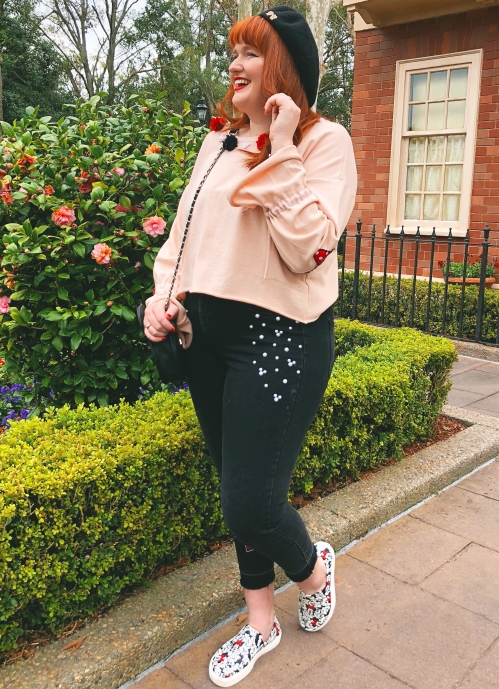
I knew going into this that I wanted something that was simple, comfortable, yet still had little flashes of Minnie Mouse throughout the entire outfit. I didn’t want to be completely covered in dots, so I headed to my local Target in search of the perfect top and bottoms! Straight to the sale section I went and found a pair of high-waisted black denim wash jeans (only $14) and an adorable light pink cropped sweater top, with a long-sleeve single ruffle bell-sleeve. My outfit was slowly coming together and the first thing we had to create was the Minnie bow patches!

My idea was to add elbow patches onto the sleeves to put that little extra flair without having the top screaming Minnie Mouse. I am definitely into the subtle touches and this is one of my favorite things on the tee now! Here are the ways that we were able to create this Minnie bow patch!
- First things first, find a Minnie bow template online. (There are tons of different ones, but pick your absolute favorite!)
- Size the bow template to the size you prefer, print this out and use it as if it were a pattern for your bow.
- Grab the fabric you would like to use, and trace the design onto the fabric using a paint pen. We decided to go with black on this one, but you can do yours however you would like! (Using a paint pen will help keep the edges of your fabric from fraying when you begin the sewing process!)
- Cut around the tracing so you have your own Minnie bow and find the perfect placement on your top. Use pins to keep the bow attached to your top so it doesn’t slide around when you begin sewing.
- Cut about 18 inches of yarn and thread the yarn through a yarn needle, knot the end!
- Begin with the needle puncturing the inside of the fabric. Come up through the edge of the bow and make a running stitch by making the stitches about a 1/4th of an inch long. (up through the fabric, down through the fabric, make sure to make space in between that stitch and repeat.) It’s definitely easier than it seems, if I can do it, ANYONE can!
I am absolutely in love with the way the bows turned out on the top! They are the perfect, subtle touch of Minnie Mouse that I wanted in the outfit.

Once I had both sleeves done, I focused on the collar of the top. I decided to place red and black pom-poms around the neck-line with little hidden Mickey puff balls in between. I really wanted to challenge myself with this DIY and create something that I definitely don’t have in my closet. I had some help from my mom who taught me how to make the pom-poms, which ended up being a super easy process! Here’s a couple of steps on how you could make your own!

- Cut a piece of cardboard 1/2 an inch wide and 4 inches long. You can use anything that will hold shape, we used a folded cracker box lid!
- Cut a piece of yarn about 3 inches long and lay it along the edge of the cardboard. Hold yarn with your thumb to keep in place.
- With the free end of your roll of yarn, place that end in the middle of the cardboard and hold that piece with your thumb. (You should be holding three things now, the cardboard, the string of yarn and the yarn that is attached to the roll of yarn.)
- Begin winding yarn around the cardboard. The more times you wind, the bigger and fuller the pom pom will be!
- Once you have wound as much as you’d like, hold the two ends of your cut string and pull the wound string off the cardboard. Tie the ends tightly with the cut string.
There will be ton of loops so cut through them and fluff them to make a pom-pom. - Trim around the pom to create the shape and you are done!
When the pom-poms were finished, I placed everything out the way I wanted it to look on the top and began gluing! I used fabric fusion glue to make sure that they would really stick to the material on the top and put about the size of a dime underneath the pom-poms and a little bit smaller than that underneath the white fluff balls.


I really wanted to make unique pieces that would show off my own personality and flair mixed in with a little bit of Minnie Mouse! I found the denim jeans I had been wanting forever from Target on clearance and thought they would be absolutely perfect for this outfit! I love a good black, grey denim wash pair of jeans, they match everything and anything high-waisted fits my body type perfectly. I have been loving the trend of pearls on pants, I think it is so much fun and really makes your bottoms a statement piece, so I wanted to do the same with my own!
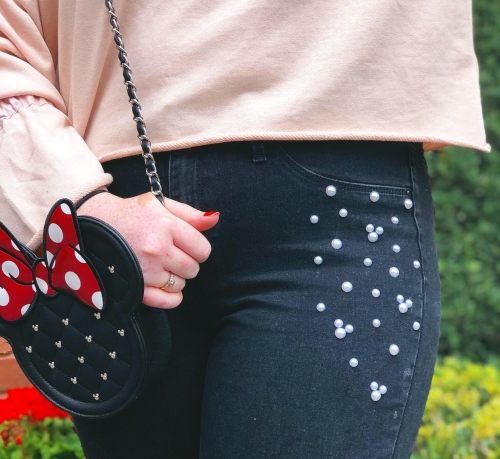
If you would like to make a pair of your own, its seriously the easiest process! Head over to your local craft store (I went to Hobby Lobby) and find flat-backed pearls. I got them in two different sizes so I could have variety and make little hidden Mickey’s throughout! Use the same fabric fusion glue that you used on the pom-poms and viola! You have adorable jeans that have your own bit of flavor and don’t cost over $100!
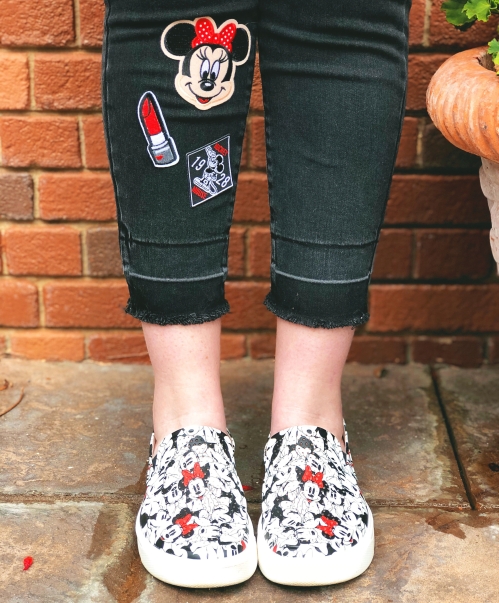
Next, I focused on the patches. I have actually never patched ANYTHING before, because I have always been too afraid to commit to putting them on something. My collection of patches is absolutely overwhelming, but I love them all and now that I have actually done it I am thinking I am just going to have to patch EVERYTHING! This outfit needed another Minnie Mouse to finish up the look, so we found a Minnie Mouse and the lipstick patch on Amazon and the Mickey Mouse patch at Box Lunch Gifts! These were all iron-on patches so it was a really easy process. I placed them onto the jeans in the way I wanted them and ironed them on! The lipstick patch did not want to stay on at first, but we finally got it to stick and I am absolutely in love with the finished product!


The only thing left was the accessories, so I thought the beret was a perfect fit for this outfit. Berets are definitely in style right now and I am in love with this trend! I added a small heart sunglasses pin that I also found at Target to the beret and thought it gave a little bit more of that Minnie Mouse inspiration that I wanted! I knew I needed a purse to go along, so thankfully my mom had an adorable LoungeFly Minnie Mouse purse that went absolutely perfectly and of course, my shoes are covered in Minnie Mouse!

I am absolutely obsessed with my shoes that I got to wear with this outfit! These are the new Crocs in collaboration with Disney that will be coming out on Monday, January 22nd for Rock the Dots and I am in love! They are the most comfortable shoes I have ever worn to the parks and certainly bring the best Minnie Style! I was so graciously gifted three different pairs to use for Rock the Dots and they are all too cute and could really go with any outfit I decide to wear to the parks.

Each of them bring their own Minnie Style into the mix and they are just too cute! The slip-ons have Minnie Mouse all over them with hints of red throughout accenting her bright red bow! The slides are perfect for a day of relaxation while showing off your favorite mouse and the heeled flip flops are the perfect amount of subtle Minnie Mouse with the little red bows all over them! I can’t wait to incorporate all of these into my daily looks because they are just too much fun.

I am so happy with the way this DIY turned out and I am definitely not letting this outfit only be for Rock the Dots. I couldn’t bear to only wear it once?! I hope this DIY inspires you to make your own fun creations, even outside of the Rock the Dots event. It’s a fun way to showcase whatever character you want! Shoutout to my mom who was the real MVP and helped me so much with this, I couldn’t have done it without her!
Happy crafting, my friends!
Allyson
Couldn’t find the exact top I was wearing, BUT I found a similar top on sale!

Leave a comment